If you have a pile of documents that have a barcode on them and you would like to attach each of them to the correct account using the number of the bar code, just follow the steps below.
Before you start you must scan in all the documents in to an empty folder. You must create a picture format of each file. Make sure the pages are scanned in the upright direction. JPEG format is preferred.
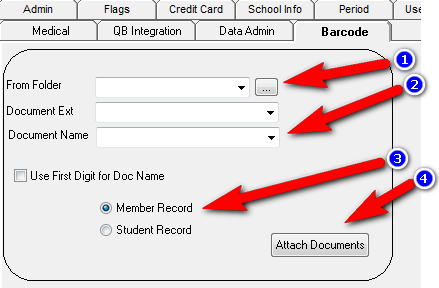
1. Go to the administration screen. Go to the Rules Tab. Go to the Barcode Tab. Click on the ... button to choose the folder where you scanned in the documents. Click on any file within the folder.
2. Choose a Document Name that you want to use for this type of document.
3. If the barcode has an account number choose members, if it has a student ID choose students.
4. Click on attach documents. It will now go thru all documents in the folder and remove the documents that it has attached successfully. All documents it couldn’t match with an account will be left in the folder.

Advanced Option
You can use the First Digit of the barcode to choose the Document Name. So if for example you have Medical Forms and OPT letters mixed together as long as the barcodes have a different first digit the system will auto sort and attach with the correct Document Name. To use click in the “Use First Digit for Doc Name” option. To setup each Digit go to the admin tab and choose Scanning Documents from the drop down of all the settings. Enter digits in the ValueText column.